Introduction

Thank you for purchasing my pattern. This is part of a long series I am calling the Motherland Collection, inspired by all things African. This is simple and quick and you can make as many as you would like in various colours as décor around the house. The video tutorial is available here.
Get the PDF pattern for a small fee on Raverly.
Please read the pattern carefully as you may miss some important steps which may affect the outcome of your project.
There is a pdf download available with photos, diagrams and tips and tricks you can purchase here.
Supplies
- DK Yarn (I am using Elle Showcase DK)
- Colour 1 (C1)(Main Colour) (50g)
- Colour 2 (C2) (25g)
- 4mm Hook
- Darning Needle
- Pair of Scissors
- Poly Fill
Difficulty Level: Beginner
Crochet Abbreviations
ch – chain
sc– Single Crochet
sl-st – slip stitch
blosc – back loop single crochet
C1 – Colour 1
C2 Colour 2
WS – Wrong side
RS – Right side
Blo sl-st – back loop slip stitch
Flo sl-st
Stitches
- Single Crochet – insert hook through stitch, yarn over pull through one loop, yarn over pull through two loops
- Back loop single crochet – working in back loop only; insert hook through stitch, yarn over pull through one loop, yarn over pull through two loops
- Slip stitch – insert hook through stitch, yarn over and pull through two loops
- Blo sl-st – Working in back loops only; insert hook through stitch, yarn over and pull through two loops
Finished Size
8 Inches (20cm) wide x 9 Inches (23cm) High
Gauge
18 Rows x 18 Stitches =4inches (10cm)
Notes:
- Turning chain counts as a stitch
- Number of stitches at the end of each row is indicated at the end in brackets
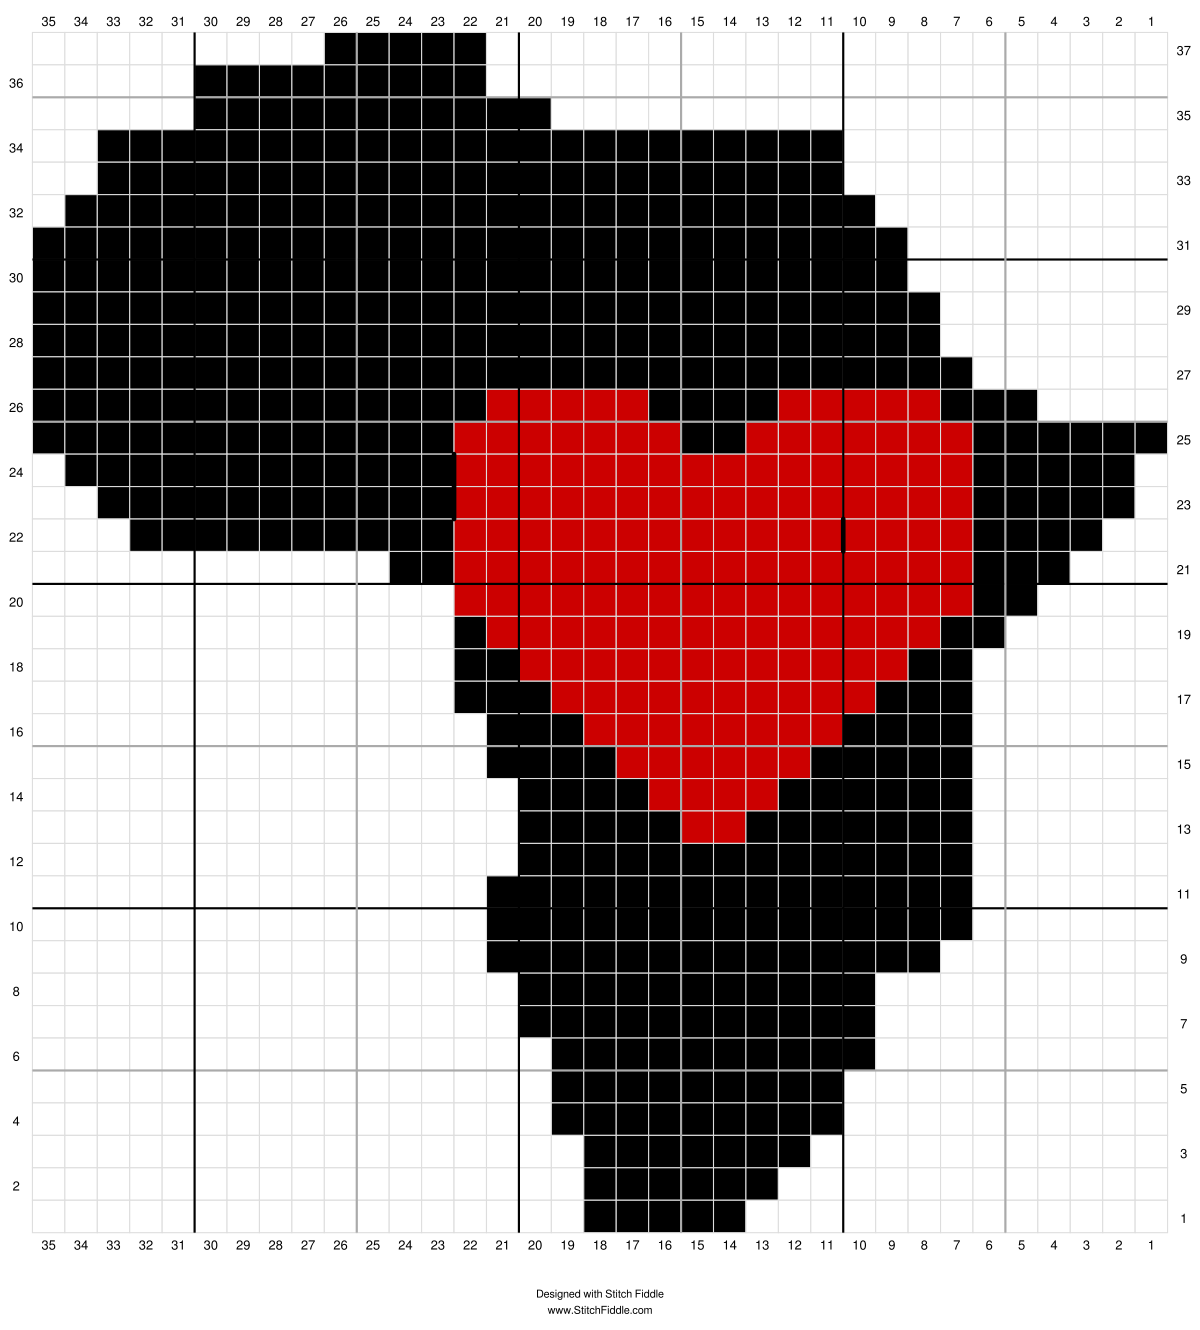
Front
With Colour 1 Ch5
R1 (WS): sc4, ch1, turn (5)
R2: sc next st, sc2, 2sc, ch1, turn, (6)
R3: sc same st, sc5, ch1, turn, (7)
R4: sc same st, sc5, 2sc, ch1, turn, (9)
R5: sc next st, sc7, ch1, turn, (9)
R6: sc next st, sc6, 2sc, ch1, turn, (10)
R7: sc next st, sc7, 2sc, ch1, turn (11)
R8: sc next st, sc9, ch1, turn (11)
R9: 2sc same st, sc9, 2sc, ch1, turn (14)
R10: sc next st, sc11, 2sc, ch1, turn (15)
R11: sc same st sc13, do not ch1, turn (15)
R12: sl-st, ch1, sc next st, sc12, ch1, turn, (14)
R13: sc next st, sc5, change to C2, sc2, change to C1 sc5, ch1, turn (14)
R14: sc next st, sc2, change to C2, sc4, change to C1 sc6, ch1, turn (14)
R15: sc next st, sc2, change to C2, sc6, change to C1 sc2, 2sc, ch1, turn (15)
R16: sc next st, sc1, change to C2, sc8, change to C1 sc4, ch1, turn (15)
R17: sc next st, sc1, change to C2, sc10, change to C1 sc1, 2sc, ch1, turn (16)
R18: sc next st, change to C2, sc12, change to C1, sc2, ch1, turn (16)
R19: sc same st, change to C2, sc14, change to C1, sc, ch1, turn (17)
R20: sc next st, sc14, change to C1, sc, 2sc, ch1, turn (18)
R21: sc same st, sc2, change to C1, sc16, change to C1, 2sc, ch8, ch1, turn (29)
R22: sc next st, sc8, change to C2, sc16, change to C1, sc4, ch1, turn (30)
R23: sc same st, sc3, change to C2, sc16, change to C1, sc9, 2sc, ch1, turn (32)
R24: sc same st, sc10, change to C2, sc16, change to C1, sc5, ch1, turn (33)
R25: sc same st, sc4, change to C2, sc7, change to C1 sc2, change to sc, sc7, change to C1, sc11, 2sc, ch1, turn (35)
R26: sc next st, sc12, change to C2, sc5 change to C1, sc4, change to sc, sc5, change to C1, sc3, do not ch1, turn (31)
Cut C2, weave in ends
R27: sl-st 2, ch1, sc27, ch1, turn, (29)
R28: sc next st, sc 26, ch1, turn, (28)
R29: sc next st, sc 26, ch1, turn (28)
R30: sc next st, sc 25, ch1, turn, (27)
R31: sc next st, sc 25, do not ch1, turn (27)
R32: sl-st,ch1, sc next st, sc23, ch1, turn (25)
R33: sl-st, sc next st, sc21, ch1, turn, (23)
R34: sc next st, sc 21, do no ch1, turn, (23)
R35: sl-st 9, ch1, sc10, ch1 turn, (11)
R36: sc next st, sc7, ch1, turn, (9)
R37: sc next st, sc3, ch1, do not turn, (5)
DO NOT CUT YARN
Edge
Working the edges (will be worked round)
R39: Sc evenly all round, sl-st in ch1, do not turn (110)
R40: Blo sc all round (110)
Cut, weave in ends and set aside for joining later
Cut weave in ends.
Back

With Colour 1 Ch5
R1: sc4, ch1, turn (5)
R2: sc next st, sc2, 2sc, ch1, turn, (6)
R3: sc same st, sc5, ch1, turn, (7)
R4: sc same st, sc5, 2sc, ch1, turn, (9)
R5: sc next st, sc7, ch1, turn, (9)
R6: sc next st, sc6, 2sc, ch1, turn, (10)
R7: sc next st, sc7, 2sc, ch1, turn (11)
R8: sc next st, sc9, ch1, turn (11)
R9: 2sc same st, sc19, 2sc, ch1, turn (14)
R10: sc next st, sc11, 2sc, ch1, turn (15)
R11: sc same st sc13, do not ch1, turn (15)
R12: sl-st, ch1, sc next st, sc12, ch1, turn, (14)
R13: sc next st, sc12, ch1, turn (14)
R14: sc next st, sc12, ch1, turn (14)
R15: sc next st, sc11, 2sc, ch1, turn (15)
R16: sc next st, sc13, ch1, turn (15)
R17: sc next st, sc12, 2sc, ch1, turn (16)
R18: sc next st, sc14, ch1, turn (16)
R19: sc same st, sc16, ch1, turn (17)
R20: sc next st, sc14, 2sc, ch1, turn (18)
R21: sc same st, sc16, 3sc, ch8, turn (29)
R22: sc next st, sc28, ch1, turn (30)
R23: sc same st, sc28, 2sc, ch1, turn (32)
R24: sc same st, sc31, ch1, turn (33)
R25: sc same st, sc31, 2sc, ch1, turn (35)
R26: sc next st, sc29, do not ch1, turn (31)
R27: sl-st 2, ch1, sc27, ch1, turn, (29)
R28: sc next st, sc 26, ch1, turn, (28)
R29: sc next st, sc 26, ch1, turn (28)
R30: sc next st, sc 25, ch1, turn, (27)
R31: sc next st, sc 25, do not ch1, turn (27)
R32: sl-st,ch1, sc next st, sc23, ch1, turn (25)
R33: sl-st, sc next st, sc21, ch1, turn, (23)
R34: sc next st, sc 21, do no ch1, turn, (23)
R35: sl-st 9, ch1, sc10, ch1 turn, (11)
R36: sc next st, sc7, ch1, turn, (9)
R37: sc next st, sc3, ch1, turn, (5)
DO NOT CUT YARN
Edge
Working the edges (will be worked round)
R39: Sc evenly all round, sl-st in ch1, do not turn (110)
R40: Blo sc all round, join at the top of ch1, (110)
DO NOT CUT YARN
Joining two sides
Place the two pieces WS out, join by blo sl-st and leave 5 stitches unworked,
Turn the pillow to the RS
Insert poly fill into the pillow, do not over stuff to keep the shape of the map
Using a darning needle, sew together the in the front loop only.
Cut & weave in ends.
All Rights Reserved. You are not allowed to alter the pattern in any way. You are not allowed to sell this or present this pattern as your own. You are also not allowed to use the images in the written pattern. You are not allowed to create a video tutorial or translate the pattern.
You can sell items made from this pattern and tag me using the social media links below where possible.
Feel free to send me a message if you have any questions about the pattern. or e-mail alichecreations@gmail.com
For more free patterns and tutorials check out my blog and YouTube Channel
Let’s link up on social media:
Facebook Instagram TikTok Pinterest
Comments
Post a Comment